Updated 14 November 2024
The PAL Key is one of the biggest sources of randomness, lost runs and frustration in MGS1. Shortly after reaching the Underground Base, you lose the PAL Key and have to find it again. Outside of the Big Boss set of categories, the favoured approach is to reenter Underground Base 1 with 11 (or more) Alerts, which causes the card to be in one of seven drainage ditch locations at random.
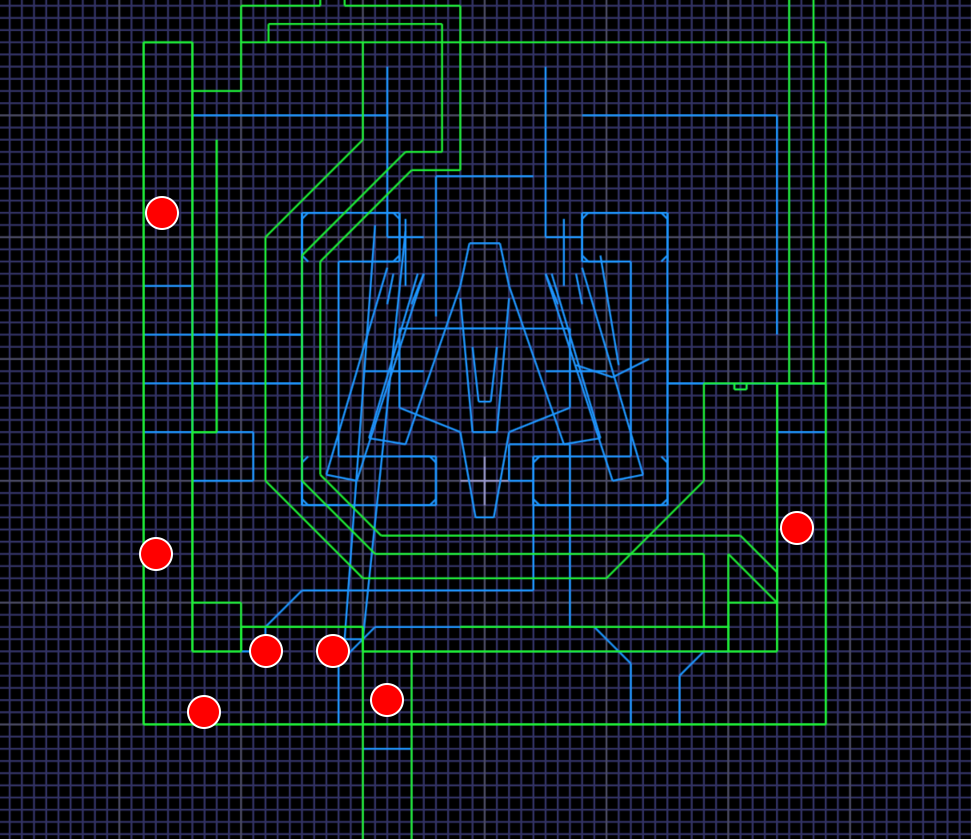
Players will go west through positions 6 to 1, then if they still haven't found the key, backtrack to position 7 on the other side of the map. Generally positions 1, 2 and 7 (and maybe 3) are considered bad and will often prompt a reset.
Every so often, someone decides to try and figure out a way to manipulate the selection of the key's position through gameplay. The short answer is that you can't - the selection is done using true [pseudo]randomness. The longer answer is that some positions are more likely than others, although it's unlikely to help in practice.
The position selection occurs when you'd expect it to - the moment you enter UGB1. At this point, the game creates an 7-value array where the initial value at index 0 is position 0, index 1 is position 1, and so on. These positions 0-6 are not the same positions 1-7 that the community uses.
Now, it goes through a simple shuffling algorithm:
The random swap index can be the same as the current index - if that happens, no swap occurs. And because a position can be swapped forward, it can be the subject of a swap multiple times.
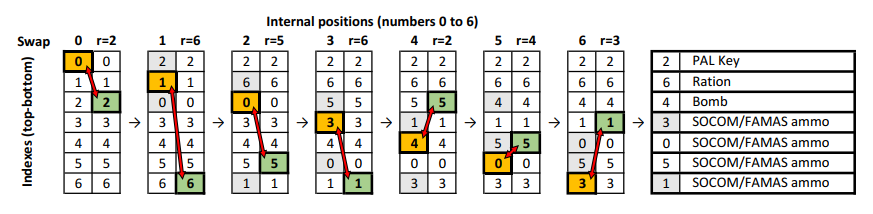
The randomness is provided (on PC) by Windows' rand() function (console may use a different random number function), with all 7 calls performed in succession. The game uses modulo arithmetic to constrain the result to between 0 and 6.
There's a very small uneven distribution in the PRNG as a whole. And because of how the positions are swapped one after another, earlier positions are more likely to be swapped multiple times. This means some permutations are more likely than others.
After swapping, these items are placed at the positions at indexes 0 to 2:
The positions for the last four indexes instead get either a pack of SOCOM ammo, or a pack of FAMAS ammo (or nothing, if you don't have the appropriate weapon). This is decided by using the same PRNG, modulo 2:
Estimates of PAL Key and Bomb probabilities by position:
| Internal | Community | PAL probability | Bomb probability | ||
|---|---|---|---|---|---|
| Before bomb | After bomb | Total | |||
| 3 | 6 | 14.66% | - | 14.66% | 16.71% |
| 5 | 5 | 9.87% | 2.40% | 12.27% | 14.32% |
| 4 | 4 | 8.51% | 4.87% | 13.38% | 15.42% |
| 2 | 3 | 7.64% | 8.52% | 16.16% | 12.54% |
| 1 | 2 | 5.70% | 12.21% | 17.91% | 13.35% |
| 0 | 1 | 2.14% | 12.15% | 14.29% | 14.28% | 6 | 7 | - | 11.33% | 11.33% | 13.38% |